Tuesday, May 4, 2021

Quiet meadow thinking of you

Good morning, 

Today is a very exciting day as it is the new annual catalogue launch day from stampin'up. 

There are so many great new stamps, papers, in colours and embellishments please take a look as you will love how everything coordinates together to make beautiful cards, 3D projects and scrapbooking pages.

I have seen lots on examples on Facebook and Pinterest already. 

I have opted to show the Quiet meadow bundle with my card today, this is a stamp and die bundle set ( so has 10% reduction on total price). It has a more vintage style to it and mixes well with some of the other more vintage style sets that are available or you may have already purchased in the past. 

I have made a diorama card, which folds flat for postage and forms a box shape for standing to display. 

Cut  2 pieces of misty moonlight cardstock cut to 14.8 cm x 10.5 cm scored at 1cm and 2 cm from each end of both pieces of card. I used one of the the stitched rectangle dies to cut out the aperture on one piece of the cardstock.

white cardstock cut to 10.5cm x 10cm to fit in centre of inside of card

I blended a background of pool party ink using the stampin'up brushes on the piece of white card.  Then  stamped the wild flowers using black memento ink. The flowers and leaves were coloured in using the new fresh freesia and soft succulent blends.

I then  die cut several of the leaves from the die set and used as background and some attached to the front of the card, I used  soft succulent and evening evergreen cardstock. To complete my card I cut out some butterflies using the new in colour paper pack ( pale papaya) stamped and cut the sentiment from the same stamp and die set using another piece of white card and black memento ink. The card was completed with some gold pearls along the two larger butterflies

I hope you like this project 

If you would like any of the items that were used for this project please head over to my on line shop. 

The Host code for May is 7G36HNKH for orders less than £150 you will receive a small gift from me the following month for using this code. 


Quiet meadow bundle £49.50


New in colour ink pads £31.50


In colour paper stack £10.75


fresh freesia blends £8.50


Blending brushes £11-25


If you would like to join as a hobby or business demonstrator then there is currently a special starter kit promotion where you can as a new member get £154 worth of products of your choice for £99 + free business supplies and free postage. A  SUPER offer and  you could be part of my crafting4friends team. I would love to have you on board. please contact me for further details.


Friday, April 9, 2021

Butterfly Brilliance Pop up acetate card

 Hello 

Awww I love butterflies and just had to do another project using them. I had wanted to have a go at a pop up acetate card for a while. Fortunately I was able to see some on Pinterest, although they were done some time ago. So I have done a version with some of Stampin'up latest stamps and dies. The Butterfly Brilliance stamps and the Brilliant wings dies which come as a bundle so a saving of 10%when purchased.


Requirements for this project: Calypso Coral cardstock, petal pink cardstock, DSP, Stamp and dies as above, stamp for sentiment, die cutting machine ( large one need for this die set) window sheet , inks and colouring tools, I used blends for mine, double sided tape and glue. Embellishments as desired.

To make the card I cut a piece of cardstock 10 1/2 inches x 5 7/8 inches 

Score with long side at top of scoring board or trimmer at 4 1/4, 4 3/4, 5 1/4, 5 3/4 and 6 1/4 inches the folds then will make a holding area for your acetate . 


Burnish all folds and make mountain and valley folds for the outside see photo below 


For the inside see photo below 


Adhere the folds on the outside of the card I found double sided tape is good for this as strong and not messy. 


Now on the inside of your card place 2 strips of double sided tape as per photo do not stick these together yet as you will need to prepare your acetate for this. 


Before I did the centre feature of my card I decorated the front and inside of mine. For this card I used ta piece of the ornate Garden speciality paper as it matched in with the colour cardstock I chose.
I matted and layered a piece of petal pink cardstock cut to 5 5/8 x 4 inches and a piece of DSP 5 3/8 x 3 1/4 inches. I did this twice as I wanted a layer inside my card to. 
I then decorated the outside of my card using the butterflies ,ribbon and pearls. 

Inside of the front side  of the card I adhered my second matt and layer as on front of card. 
I attached 3 butterflies to separate pieces of 1/.2 inch strips of acetate and attached to one side of the card, the 2 inch x 5 7/8 piece of acetate needs to be inserted prior to the inside folds of the card being sealed.

after sealing and decorating inside below 
This card design can be used for flowers, butterflies, dragonflies, balloons and all sorts of fun cards. 
Have a try and show me how you got on.
Until next time 
hugs and blessings 
Ruth xx 

Please note all supplies for this project can be found at my on line shop. 
Host code for April 2021 747JPDXB for orders of under £150 you will receive a small gift from myself next month. If you would like to join the stampin'up family and become a demonstrator then please do not hesitate to contact me I would love you to join my team. 

Saturday, March 13, 2021

Butterfly Bijou handbag card

 Hello to you. I do hope that you are enjoying the longer hours of daylight and the signs of new life appearing through the soil and the lambs being born. A hopeful sign for the future. 

Today I have chosen to share with you an idea I was given by Sharon Chapel. To make a card in the shape of a bag. 

I have used the new delightful Butterfly Bijou papers, dies, the heart strip is from the floral heart dies and the curved edge was made by the god morning magnolia die set. I made a second one to layer card cut at 10.5 x 3.5cm 

I really enjoyed putting this one together and it is not at all difficult to make. 

The whole card uses 1 sheet of cardstock and some papers 

Cut the card 10.5cm x 29.5cm 

Score along long side at 9cm 12cm 15cm 24 cm and 26cm 

Burnish and fold ( see card photo ) 

Paper panels are cut at 10cm x 8.5cm x 2 

Inside panel I used white card 10cm by 10.7cm scored at 2cm 

Bag handle is 10cm x 1cm scored at 1cm and 2cm form each edge.


I will be making this card in one of my classes soon so please come and join me if you can. Further details for classes on my web page https://crafting-4-friends.stampinup.net/

Host code for March is 4SKFWNTB for orders under £150 and a small gift from myself to you. 

Until next time hugs and blessings 

Ruth xx


Floral Heart Dies


Wednesday, February 17, 2021

Friends are like seashells

 Hello again. 

I trust that you are keeping safe and well. Already it is mid February and I have noticed the nights are drawing out. Here in the UK we are still in a National lockdown. But my thoughts have been reflecting on summer and trips to the beach. So this week I grabbed the new friends are like seashells stamp set and with a challenge to use coloured block technique from Anne Ronsky from Ashesinkyfingers. I came up with the card below.


I have used pacific point, for my base card. Pacific point, pool party for the background stamped block image. The shells are stamped using soft suede and infilled using petal pink. For this simple card I fussy cut the shells to arrange on my card using dimensionals for some depth. The sentiment comes form the same stamp set and stamped using pacific point. 

Please don't miss out on Sale-A-Bration the current one ends on 28th February.

If you wish to place an order please use host code SKBWUMWQ for orders under £150 for a small gift from me next month. If I can help you with anything please do contact me.

Until next time 

Hugs and blessings 

Ruth xx 


Monday, January 25, 2021

Floating and Fluttering

 Hello again, 

So sorry it's been such a break between my posts. Great to be back again. Happy to be sharing with you today the Floating and Fluttering bundle from stampin'up. This is one of the new sets available in the new mini catalogue. The bonus is for Jan and Feb 2021 every order of £45 or multiples of you can get a free item from the Sale- A- Bration Catalogue. There are some great choices this year so please take a look. I will endeavour to add some more examples here on my blog page.

I do trust you are able to spend some time crafting and taking your mind off the ongoing pandemic. I love spending time crafting and have been learning a lot of new techniques and trying out some new fun card folds that I have not previously done. 

This lead me on to the card I have for you today. I have tried a tri fold card and am delighted with the outcome. It is a monochromic look as I have used Bermuda Bay ink and paper ( from the Sale-A-Bration catalogue) there is a touch of garden green to the leaves. 


please follow the links if you would like to purchase from my online shop. January Host code for orders under £150 is    KT2J69VY     please use this to receive a small gift from myself the following month. 

Any questions please do not hesitate to ask 

Thank you for popping by and I hope to see you again soon 

Hugs and blessings 

Ruth 


Monday, November 16, 2020

Pop Up Freezin'fun Christmas Card

 Hello, Thank you for popping by to look at my blog today. I am going to share a card I made for my Inspiration Wednesday Facebook live session last week. I love a fun stamp set to use every so often as I love to use a variety in my projects. So I picked up the freezin'fun bundle and got to work. 

This project is a fun pop up card that folds flat for postage to it's recipient. It can be used for any papers and stamp sets, there are quite a few on Pinterest that show how this card fold has been used.


Seaside Spray cardstock

Piece 1 cut to 11 ½ x 4 inches

Piece 2 cut to 5 ½ x 3 inches

Score large piece along the long side at 5 ¾, 7 ¼, 9 ½ and 11 inches

Score smaller piece along the long side at ½ and 2 inches

Burnish all score lines

Before adhering the card front you will need to decide your background paper or stamped design and adhere or stamp prior to making up the card box front.

I have used one of the sheets form the feels like frost papers in the mini Christmas catalogue as my background 

On the picture you can see the tape across the narrower folded end this will be folded under to adhere to the card front.


This picture shows the card flattened with the base box made


I have applied tear and tape to the narrow fold (not seen in this picture and some to the back of this box. You can use the glue that you are happy with but this showed up best for the photo!


This is how your box card will look from the side 

To finish my card I put another piece of seaside spray card cut at

4 x 2inches and put inside the lower box

On the back I cut out a piece of whisper white card stock and 4 x 2 ¾ inches attached a sentiment and decorated as photo below


Thank you for taking time to have a look. Below is a list of some of the products used to make this care. they link directly to my stampin'up shop. 

Wednesday, November 4, 2020

Peace and Joy meets snowflake splendor

 Hello again,

Thank you for taking a look at my blog. 

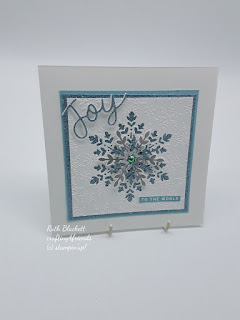
 Today I would like to share with you a card I made for my Facebook live recently using the Snowflake splendor stamps and dies and the peace and joy stamps and dies. 

It is so good that stampin'up products mix and match with each other given you more creativity. I decided to go sparkly with this one. Can't have too much sparkle at Christmas!! 


The card base is 14 x 14 cm 

The colours used are balmy blue cardstock 11 x 11 cm  , balmy blue sparkly paper 10.5 x 10. 5 cm , small piece silver foil card for snowflake and whisper white 10x 10 cm.

The whisper white paper was  embossed using the snowflake embossing folder. The largest snowflake was cut out using the largest snowflake die into the whisper white embossed card. 

I stamped and embossed a silver snowflake then die cut. die cut a balmy blue sparkly snowflake and a silver snowflake.

The Joy was die cut form the peace and joy set in both whisper white and balmy blue sparkly card. 

To the World was stamped onto white cardstock in balmy blue and cut close to the edge.

The  card  was made up in layers see photo, the centre of the large snowflake was made up then adhere to the embossed card using dimensionals.

the Joy was adhered using some small slither of dimensionals ( from edge)

Thank you for taking a look at my blog, I look forward to sharing with you some more ideas in the coming days. 

hugs and blessings 

Ruth x

If you would like to purchase any of the lovely stamps and dies sets, click on the link below to my online shop. 

Novembers  host code is GTWVBVKY for orders below £150 orders above this then you will be the host and receive the benefits. 


Snowflake splendor suite


balmy blue glimmer paper


Quiet meadow thinking of you

Good morning,  Today is a very exciting day as it is the new annual catalogue launch day from stampin'up.  There are so many great new s...